
Guide · Updated
How to install a GeeekPi Low-Profile Plus on a Bitaxe Gamma 601/602
Install steps for the GeeekPi Low-Profile Plus Socket Adapter, GeeekPi Radiator Fan Adapter (Noctua A6) and GeeekPi Socket + Fan Combo on the Bitaxe Gamma 601 and Bitaxe Gamma 602, with a GeeekPi Low-Profile Plus. Find your part below and follow its steps. Coolers, fans and miners are sold separately.
Which part do you have?
- GeeekPi Low-Profile Plus Socket Adapter
- GeeekPi Radiator Fan Adapter (Noctua A6)
- GeeekPi Socket + Fan Combo
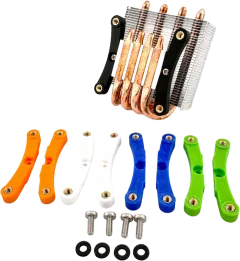
GeeekPi Low-Profile Plus Socket Adapter
For the Bitaxe Gamma 601 and Bitaxe Gamma 602 · View part: GeeekPi Low-Profile Plus Socket Adapter
You’ll need
- CoolerGeeekPi Low-Profile Plus CPU cooler heatsink
Cooler, fan and miner are not included.
In the package
- 1 setprinted socket adapters (pair)
- 4×heat-set brass inserts (installed)
- 4×stainless screws
- 4×plastic washers
Steps
- Power down the Bitaxe, remove the stock heatsink and clean the old thermal paste off the ASIC.
- Apply fresh thermal paste.
- Fasten the adapter to the Bitaxe mounting holes with the included screws and washers, tightening evenly in a cross pattern.
- Seat the GeeekPi Low-Profile Plus and secure it to the adapter.
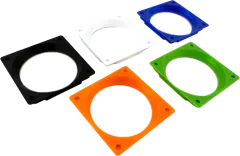
GeeekPi Radiator Fan Adapter (Noctua A6)
For the Bitaxe Gamma 601 and Bitaxe Gamma 602 · View part: GeeekPi Radiator Fan Adapter (Noctua A6)
You’ll need
- CoolerGeeekPi Low-Profile Plus (uses its stock clasps)
- FanNoctua A6 or a similar fan, in place of the stock fan
Cooler, fan and miner are not included.
In the package
- 1×printed radiator fan adapter
- —mounts with the cooler’s stock clasps, no extra hardware needed
Steps
- Unclip the stock fan from the GeeekPi Low-Profile Plus.
- Fasten your Noctua A6 (or similar) fan to the adapter.
- Clip the adapter onto the heatsink with the cooler’s stock clasps.
- Plug the fan into the Bitaxe fan header — check the fan’s polarity first.
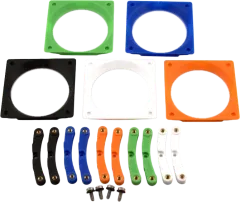
GeeekPi Socket + Fan Combo
For the Bitaxe Gamma 601 and Bitaxe Gamma 602 · View part: GeeekPi Socket + Fan Combo
You’ll need
- CoolerGeeekPi Low-Profile Plus CPU cooler heatsink
- FanNoctua A6x15, A6x25 or a similar fan
Cooler, fan and miner are not included.
In the package
- 1 setprinted socket adapters (pair)
- 1×printed radiator fan adapter
- 4×heat-set brass inserts (installed)
- 4×stainless screws with plastic washers
Steps
- Power down the Bitaxe, remove the stock heatsink and clean the old thermal paste off the ASIC.
- Apply fresh thermal paste.
- Fasten the adapter to the Bitaxe mounting holes with the included screws and washers, tightening evenly in a cross pattern.
- Seat the cooler, then swap its fan onto the fan adapter using the stock clasps.
- Plug the fan into the Bitaxe fan header — check the fan’s polarity first.
Need a hand?
Not sure this cooler fits your miner? Check the compatibility chart. Stuck on a step? Send us a message and we’ll reply, usually within one business day.